Navigating the Labyrinth: A Guide to the Vault of Glass Oracle Map in Destiny 2
Related Articles: Navigating the Labyrinth: A Guide to the Vault of Glass Oracle Map in Destiny 2
Introduction
With enthusiasm, let’s navigate through the intriguing topic related to Navigating the Labyrinth: A Guide to the Vault of Glass Oracle Map in Destiny 2. Let’s weave interesting information and offer fresh perspectives to the readers.
Table of Content
Navigating the Labyrinth: A Guide to the Vault of Glass Oracle Map in Destiny 2
The Vault of Glass, a legendary raid from Destiny 1, made its triumphant return in Destiny 2’s Beyond Light expansion. This challenging encounter, known for its intricate puzzles and demanding mechanics, features a unique element that adds a layer of complexity and strategy: the Oracle Map.
Understanding the Oracle Map
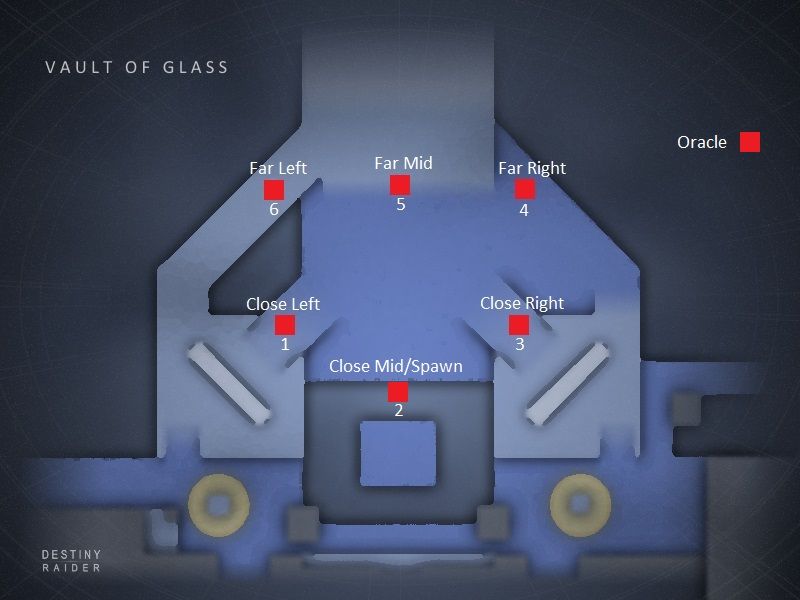
The Oracle Map, a crucial component of the Vault of Glass raid, serves as a visual guide for players during the "Oracle" encounter. This encounter requires precise timing and coordination as players must activate and deactivate specific Oracles in a set sequence to progress. The Oracle Map, displayed on the screen during the encounter, depicts a grid of numbered Oracles. Each Oracle corresponds to a specific location within the encounter area.
Decoding the Oracle Map
The Oracle Map uses a system of colors and symbols to convey the necessary information.
- Color: Each Oracle is assigned a color based on its activation sequence. The colors are consistent throughout the encounter.
- Number: Each Oracle is assigned a number, corresponding to its position on the map.
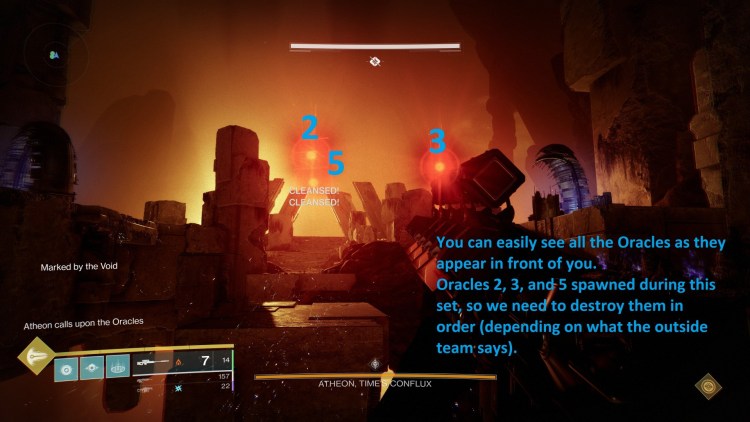
- Symbol: The symbol on the map represents the Oracle’s activation state. A filled-in symbol indicates the Oracle is active, while an empty symbol indicates it’s inactive.
Navigating the Oracle Sequence
The Oracle Map is not static; it changes throughout the encounter. The sequence of Oracles to activate is dynamic and must be deciphered by the players. The map provides crucial clues to solve this puzzle. Players must carefully observe the map, noting the order of colors and the changing symbol states.
Strategies for Success
Mastering the Oracle Map is essential for navigating the Vault of Glass raid successfully. Here are some strategies to optimize your approach:
- Designated Roles: Assign specific roles to players, such as "Map Reader" and "Oracle Activators." This division of labor ensures smooth execution.
- Communication: Clear and concise communication is vital. The "Map Reader" should relay the Oracle sequence to the team, while "Oracle Activators" should confirm their actions.
- Visual Cues: Pay attention to the visual cues in the environment. The Oracles themselves may emit a specific color or light when activated, which can help confirm the sequence.
- Practice and Repetition: The Oracle encounter requires practice and coordination. Familiarize yourself with the map and the activation mechanics through repeated attempts.
Importance of the Oracle Map
The Oracle Map serves as a central element of the Vault of Glass raid, adding a layer of strategic depth and challenge. It requires players to work together, analyze information, and execute precise actions. Mastering the Oracle Map is crucial for progressing through the encounter and ultimately defeating the raid’s final boss.
FAQs about the Vault of Glass Oracle Map
Q: How many Oracles are there in the Oracle encounter?
A: There are 12 Oracles in the encounter.
Q: What do the different colors on the map represent?
A: The colors on the map represent the order in which the Oracles need to be activated.
Q: How can I tell if an Oracle is active or inactive?
A: The symbol on the map indicates the Oracle’s activation state. A filled-in symbol represents an active Oracle, while an empty symbol represents an inactive Oracle.
Q: What happens if I activate the wrong Oracle?
A: Activating the wrong Oracle will result in a penalty, such as a damage pulse or a delayed activation timer.
Q: Can I activate multiple Oracles at once?
A: No, only one Oracle can be active at a time.
Q: How do I know when the Oracle sequence changes?
A: The map will update with a new sequence when the current sequence is completed.
Tips for Utilizing the Oracle Map
- Visualize the Map: Imagine the Oracle locations in your mind’s eye to better understand the map’s layout.
- Call Out Sequences: Clearly communicate the Oracle sequence to your team members.
- Pay Attention to Timing: The timing of Oracle activations is crucial.
- Don’t Forget the Map: Keep an eye on the map throughout the encounter.
Conclusion
The Oracle Map is an integral part of the Vault of Glass raid in Destiny 2. Its complex system of colors, symbols, and dynamic sequences demands strategic thinking and coordinated effort from players. Mastering the Oracle Map is a testament to a team’s ability to work together, adapt to changing circumstances, and overcome challenges. The rewards for conquering this encounter are significant, both in terms of loot and the satisfaction of conquering a truly demanding raid.


Closure
Thus, we hope this article has provided valuable insights into Navigating the Labyrinth: A Guide to the Vault of Glass Oracle Map in Destiny 2. We hope you find this article informative and beneficial. See you in our next article!